Monday, April 28, 2014

Generated Key in the Table Comparison Transform

When I first learnt how to use Data Services, I knew that I was supposed to set the Generated Key Column in the table comparison transform, but I never really thought about I why I was supposed to do that.

So lets take a look at the example above. In this example I have a dimension for Customer with a data warehouse key of CUSTOMER_KEY. This is my generated key column. I also have a field for the natural key that comes from the source system and this is CUSTOMER_NK.

I have been maintaining history on this table, so individual CUSTOMER_NK values can appear in there multiple times. Once for each row of history maintained. So if a customer has lived in more than one city, there will be a row in the customer table for each city the customer has lived in.

So data in the table might look something like this:


If a new row for John Smith arrives, lets say he moves to San Antonio, how will Data Services know which of the 3 rows with a CUSTOMER_NK of 'A' to compare against? This is where the Generated Key Column comes in. Data Services looks for the row with the maximum generated key column value and just compares against that row. So for John Smith, DS will only do the compare against the row with CUSTOMER_KEY = 3.

If you didn't set the generated key column value, then DS would compare against all 3 rows for John Smith instead of just the one with the maximum CUSTOMER_KEY.

The history preservation transform grabs the 1 update row from the table comparison transform and generates an update to close off the old row, and issues an insert for the new row for John's new address in San Antonio.

If you are not using history preservation then the Generated Key Column is not that important, but if you are doing type 2 history, then its essential that you set it for the history preservation to work correctly.


Monday, April 21, 2014

Improving Performance - Part 7 - Whats left?

If you have implemented all the things I've written about in parts 1 through 6, then your job should now be significantly faster. In most cases you will have now covered 99% of things that will improve your jobs performance, but if you want that little bit extra, then here are a few extra things to consider:

Join ranking

You can define the order in which Data Service will join tables. Tables with higher join ranks are joined before tables with lower join ranks. Typically you want your largest table to have have higher ranks that your smaller tables.

You set the join rank in the source table.


This typically only has an effect if the join is being done on the Data Services job server, in other words, Pushdown SQL is not happening. For a full and detailed explanation of how this works consult the Performance Optimzation Guide for DS.

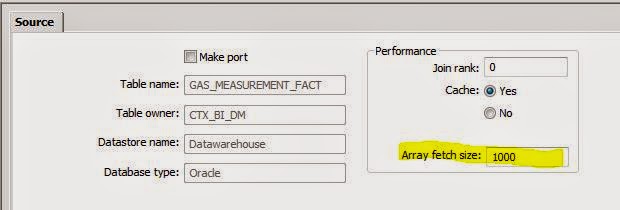
Array fetch size

If you have a powerful set of hardware in place, try raising this value and see what effect it has. Interestingly, even the DS Performance Optimisation Guide just recommends increasing and decreasing the value to see what effect it has, and just going with the value that seems to get you the best performance.

Array fetch size is also set on the source table.


Rows per commit

SAP recommends that you set this at between 500 and 2,000. Again, I just recommend changing the values up and down to see which seems to have the best effect.

Two things to consider:
  1. If you have Long datatype you are loading, then the commit size will be 1 (Does not apply to Oracle)
  2. If you are using an overflow file, and an error occurs resulting in a rejected row, then the commit size will also revert back to 1. I'll be doing a post soon on the pros and cons of using the overflow file vs using the validation transform.
Committing one row at a time will be slower than committing 1,000. So consider whether you can load the Long differently (perhaps in a large Varchar field) and decide whether you really need an overflow file.

Chat to your DBA

Seriously, some of them are actually nice people :-) Now that you've fully tuned what you can on DS, the DBA can look at making improvements in the source and target databases. 

Database performance tuning can be different depending on which database you are using, and being an expert in performance tuning on all the databases that DS can connect to would be quite a feet!

So, if you have a Data Flow that is still running too slow then just go to Validation - Show Optimized SQL, and send it over to your DBA to see if she can work some of that DBA magic.

Anything else?

If you've found something that has significantly improved the performance of one of your Data Services jobs that I did not mention in this series, then please let every-one know in the comments.


Monday, April 14, 2014

Improving Performance - Part 6 - Using the lookup_ext function

The lookup_ext function is often used to lookup foreign keys for your fact table, and to return a default if no value can be found.

One setting that is often overlooked when using the function is the caching method, labeled as Cache spec.


There are 3 options you can choose from:
  1. DEMAND_LOAD_CACHE
  2. NO_CACHE
  3. PRE_LOAD_CACHE
Most people just leave the default (PRE_LOAD_CACHE) in place. But what is the difference between the 3 options?

NO_CACHE - This option reads the values from the lookup table for each individual row, but does not cache the value. 

PRE_LOAD_CACHE - This option will load the entire lookup table into memory first before looking up the values you need.

DEMAND_LOAD_CACHE - This option will load the individual rows into memory as they are identified. So the first time DS needs a row it looks into the database, finds it and places it in memory. The second and subsequent times it looks into its own memory for the value.

So which option should you use, and what impact on performance will this have?

DEMAND_LOAD_CACHE - Use this option when you have a small number of input rows, but the table you are looking up values in is large. In this instance, using DEMAND_LOAD_CACHE over PRE_LOAD_CACHE can have a huge impact on performance.

Here is a great real life example. I recently had to run a data flow where the source table had 42 records, and the lookup table had 3,390,904 records.


I ran the job once with PRE_LOAD_CACHE to see how long it would take:


I then ran the job with DEMAND_LOAD_CACHE to see the difference:


As you can see the performance improvement in this instance is dramatic.197 seconds vs just 5 seconds.

PRE_LOAD_CACHE - You should use this option when you anticipate accessing a large number of rows in the lookup table.

I needed to use the same 3 million row table as a lookup table again, but this time the source table had 161,280 rows.


This time I ran it with DEMAND_LOAD_CACHE first:


Then I ran it with PRE_LOAD_CACHE:

In this case using PRE_LOAD_CACHE was the better choice as my source table had a lot of values when compared to the lookup table, so in effect I was looking up a far greater number of rows in the lookup table than I was in the previous example.

NO_CACHE - The only reason I can think of to use NO_CACHE is if you are running short on memory and are only accessing very few rows in the lookup table.

So as you can see from the details above, choosing the right cache option can have a huge impact on your jobs performance.

In summary the rule is, if you are going to access most of the rows in your lookup table, then use PRE_LOAD_CACHE, if you are only going to access a few rows, then use DEMAND_LOAD_CACHE. 

And if you can't figure out which one to use? Well just run the job once with DEMAND_LOAD_CACHE set, and once with PRE_LOAD_CACHE set and see which one runs the fastest for you :-)

Monday, April 7, 2014

Improving Performance - Part 5 - Table comparison transform

How you use the table comparison transform can have a huge impact on the performance of your job.

There are 3 options available for the comparison method used by the transform:

  • Row-by-row select
  • Cached comparison table
  • Sorted input
Use row-by-row select when you have very few rows to compare in relation to the size of your target table. Doing the individual comparisons for a few dozen rows will be significantly quicker than a full table comparison against a large table.

But, if you have a lot of rows to compare in relation to the size of the table, then don't use this method as it will take significantly longer.

If you have large number of rows to compare with the target table, then use either cached comparison table or sorted input. In general I find that sorted input is preferable because it seems to be quicker, and also it doesn't require as much memory to work. When it is not possible to sort the table for comparison then that leaves you with cached comparison table as your only option.

You may have noticed that the table comparison transform now has a place where you can add a filter to the rows from the target table. Lets say know that you are only getting sales figures for 2014 coming through, and therefore you only need to compare against data in the table for 2014, then add that to the filter box on the transform.


Now you'll only be comparing against the 2014 subset of the data. If you have many years of data in your target table this can also result in a massive increase in performance.

A word of caution though, be very sure that you are applying the filter correctly, because if you filter too much out of the target table, you may get false inserts.

Sometimes when you have chosen the appropriate the comparison method the time to process all the rows is still too slow. In this situation I put an extra step in the process to reduce the number of rows I need to compare against, and this can often give me as much as a 90% increase in performance.

To do this method you need to have 3 data flows, as opposed to just the one you'd normally need, but even though you'll now have 3 data flows, the total process will still be much quicker.

Lets take the example of where you are trying to load a sales fact table. The sales fact table has over one hundred million rows in it, and you are trying to add another ten thousand. The table comparison is taking ages as DS is comparing ten thousand rows to one hundred millions rows in the fact table.

Step 1 - Create a data flow where you do all the processing you need to do to load your target table, but instead of loading your ultimate target table, just load the data to a new table. I often prefix these tables with DT (for Data Transfer). This is the temporary holding place for the data you will ultimately load into the FACT_SALES table. 


Step 2 - Create a comparison data set. To do this, join the DT table to the actual target table and load the common rows into another table we will call the comparison table. So here I will join FACT_SALES to DT_FACT_SALES and load all the matching rows from FACT_SALES into the COMPARE_FACT_SALES table. 


Step 3 - Now use the COMPARE_FACT_SALES table in your table comparison as the compare table instead of the FACT_SALES table. Instead of comparing against all one hundred million rows, the table comparison will now only need to compare against no more than ten thousand rows. When it finds a row it will do an update, and where it doesn't, well that will be an insert. Then load what it finds into your fact table.


So your final data flow looks like this.


This method is best used when the number of incoming rows is significantly smaller than the size of the target table. The smaller the number of input rows in comparison to the size of the target table, the greater the performance improvement.

On the other hand, if you actually need to compare your input with most of the rows in the target table then it could actually be slower to use this method as you have to build in the time in takes to create the DT and COMPARE tables into the process.

When used appropriately, this method can make a massive difference to the overall performance of your job,.




Tuesday, April 1, 2014

Improving Performance - Part 4 - Bulk loading

Bulk loading is a great way to quickly load a large amount of data into your warehouse. The extra speed is achieved because the database will not log each individual row or apply row locks while the data is being loaded.

I find bulk loading especially useful when loading staging tables. As I typically truncate and load my staging tables I am just interested in getting my data in there as fast as possible, with the more complicated data processing taking place in subsequent data flows. So as I am just dumping the data into the staging tables I don't care about logging or row locking.

There is one situation where I tend to avoid bulk loading, and that is where the source and target tables are in the same database, and Data Services is able to push down the entire INSERT..SELECT statement to the database. This is because it tends to be much quicker to let the database run this internally, because when you turn on bulk loading all the source data is brought onto the server, and then pushed over to the target, regardless of whether the source and target are from the same datastore or not.

To use bulk loading double click on the target table in your data flow, and then click on the Bulk Loader Options tab.


Under the bulk load option change it from none, and then continue to set the rest of the settings to achieve the best performance for the database platform you are using. In this case I was using Oracle, so the options on this tab will be different depending on which database you are using.

You may need to work with your DBA to make sure that you database user has sufficient privileges to run bulk loading.

I have found that using bulk loading can have up to a 50% improvement in speed, which is especially noticeable when you are loading large tables.